Pipe Cleaner Flowers: Simple Steps For Everlasting Blooms You Can Make Today
Do you ever wish you could have fresh flowers around, but without the constant need for water, sunlight, or, you know, dealing with actual dirt? Well, you are in luck, because pipe cleaner flowers offer a truly wonderful answer to that desire. These little creations bring all the cheerful beauty and bright colors of real blossoms into your home, yet they ask for absolutely no gardening at all. It's a pretty neat trick, honestly, how something so simple can look so charming.
Making these delightful blooms is, as a matter of fact, very straightforward. They are just as easy to put together as they are cute to look at. You might be thinking they look a bit tricky, but the truth is, pipe cleaner flowers, like those pretty daffodils, graceful tulips, and even the tall hyacinths, are far simpler than they appear. They make for such lovely gifts, too, really brightening up any living space.
So, whether you are looking for a fun project to do with children, or perhaps you want to add some cheerful touches to a gathering, or maybe you just want to make some handmade presents, these little flowers are definitely the way to go. You can learn how to make pipe cleaner flowers with very basic supplies and techniques. Let's explore how to bring some whimsical, colorful, and lasting flowers into your everyday world, shall we?
Table of Contents
- Why Make Pipe Cleaner Flowers?
- What You'll Need for Your Pipe Cleaner Flowers
- Getting Started: Basic Pipe Cleaner Flower Techniques
- Step-by-Step Guides for Popular Pipe Cleaner Flowers
- Tips and Tricks for Your Pipe Cleaner Flowers
- Common Questions About Pipe Cleaner Flowers (FAQs)
Why Make Pipe Cleaner Flowers?
There are many good reasons to consider making these charming pipe cleaner flowers. For one, they provide all the wonderful beauty and vibrant shades of actual flowers without any of the usual fuss. You won't have to worry about pesky bees, for example, or keeping them watered, or even finding the right sunny spot.
These flowers are a truly delightful way to add some cheer to any room or area. You don't need a green thumb at all, which is pretty great. Whether you are spending time crafting with children, getting ready to decorate for a special event, or making thoughtful gifts by hand, pipe cleaner flowers fit the bill perfectly.
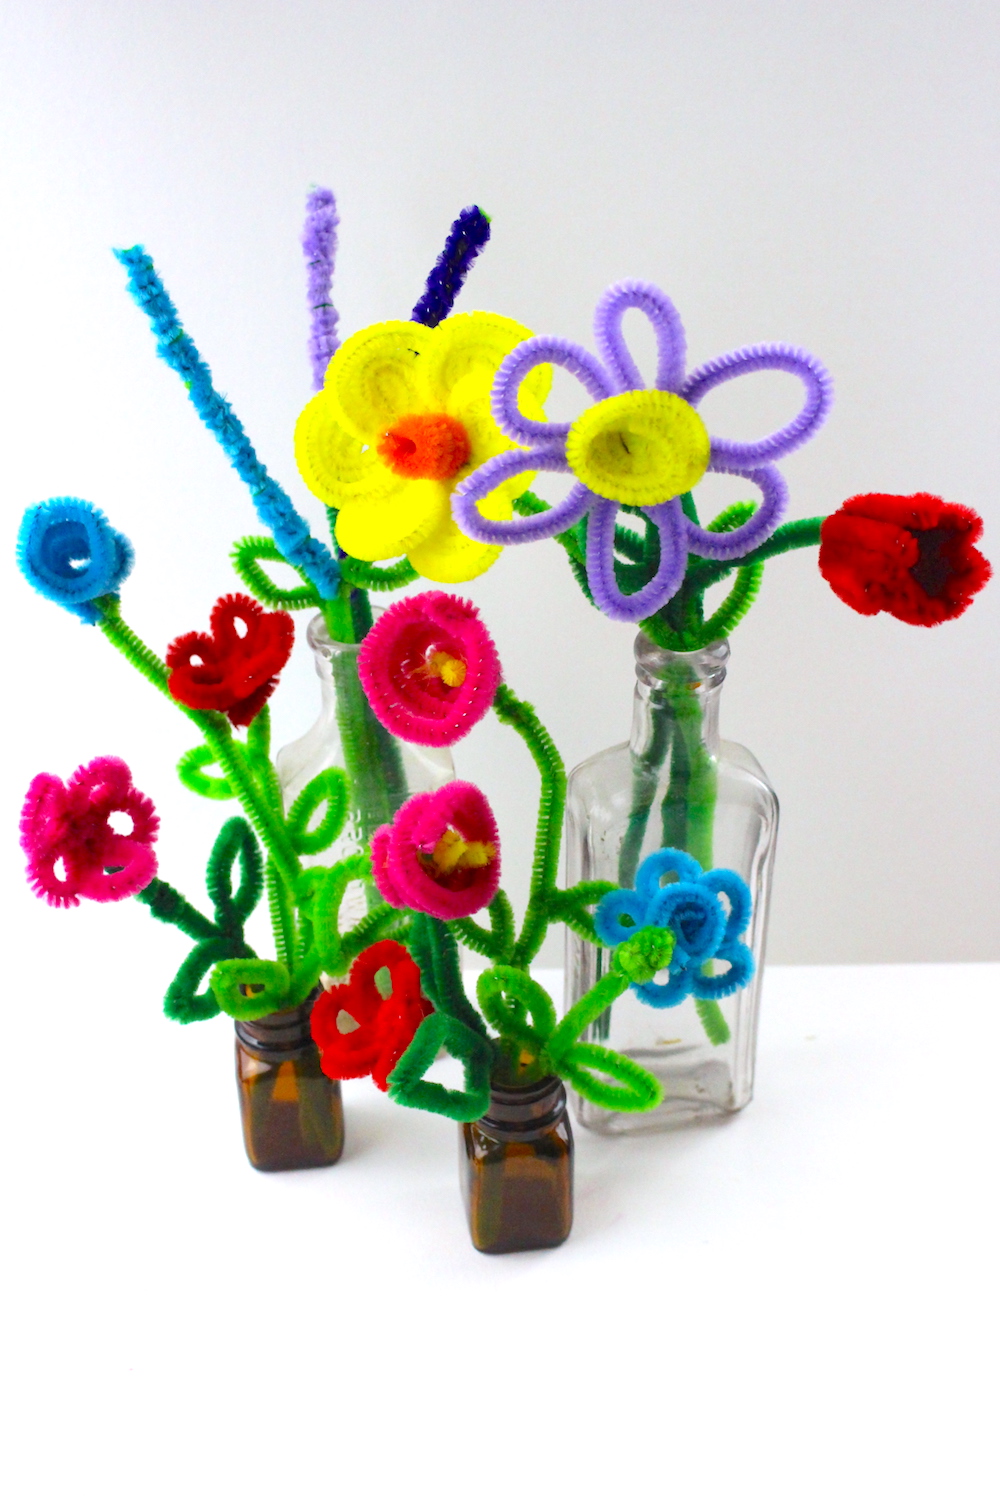
They look just adorable, too, when placed in old, clear soda bottles, giving a rustic, sweet feel to your decor. You can add these little flowers to a greeting card for a personal touch, or simply arrange them in a vase. They really do last forever, offering a lasting splash of color that never fades or wilts, which is a big plus.
The best part, perhaps, is how simple they are to create. You really only need a couple of basic items to get started. This makes them a very accessible craft for almost anyone, regardless of their crafting background. They are, in a way, a little bit of joy that you can make with your own hands.
What You'll Need for Your Pipe Cleaner Flowers
To make these adorable pipe cleaner flowers, you truly need just a couple of supplies. It's very simple, actually. The main items are, of course, pipe cleaners themselves. You will want to pick out a good variety of colors for the flower heads, and then some green pipe cleaners for the stems and leaves.
That's practically it for the core materials. Sometimes, you might find a pair of small scissors helpful for trimming, or maybe a tiny bit of craft glue for securing certain parts, but often, just the pipe cleaners are enough. This makes it a very budget-friendly project, too, which is always a nice thing.
Having a range of shades for your flowers allows for a lot of creative freedom. You can pick bright yellows for daffodils, pretty reds for tulips, or even soft purples for hyacinths. The green pipe cleaners are pretty important for making them look like actual flowers, giving them a base to stand on, you know?
So, gather your colorful fuzzy sticks, and you're more or less ready to begin. It's surprising how much beauty you can make with such humble beginnings. This is a craft that doesn't ask for a lot of fancy tools or expensive items, which is rather refreshing.
Getting Started: Basic Pipe Cleaner Flower Techniques
Before we get into making specific types of pipe cleaner flowers, it's good to understand a few basic techniques. These are the building blocks, so to speak, for creating all sorts of beautiful blooms. With just a few simple moves, you can create lovely shapes that truly resemble flower petals.
The whole process is quite forgiving, actually. If something doesn't look quite right the first time, you can usually just unbend the pipe cleaner and try again. This makes it a really good craft for learning and experimenting. It's almost like playing with soft, bendable wire, but with a fuzzy, friendly feel.
Choosing Your Colors
Picking your pipe cleaner colors is, perhaps, the first fun step. You can go for colors that mimic real flowers, like yellow and orange for daffodils, or red for tulips. Or, you could get a little wild and pick your very favorite shades, creating flowers that are completely unique and imaginative.
For example, if you're making daffodils, you'll definitely want yellow and orange, plus some green for the stem. If tulips are your aim, red or pink pipe cleaners work wonderfully with green. Don't be afraid to mix and match a bit, too. A flower with multiple petal colors can be quite striking, you know?
The green pipe cleaners are pretty essential for the stems. They give the flowers a natural look and also provide stability. Having a good supply of both colorful pipe cleaners and green ones will help you make many different kinds of pipe cleaner flowers.
Forming the Petals
Creating the petals is where the magic happens. Generally, you'll bend and twist the pipe cleaners into loops or folds that look like flower petals. For many flowers, you might start by laying a few pipe cleaners together, then twisting them in the middle to secure them.
You can make small loops for delicate petals, or wider, more open shapes for larger blooms. The fuzzy texture of the pipe cleaners helps them hold their shape once you've bent them. It's a bit like sculpting, but with very soft material. This part is pretty intuitive once you try it a couple of times.
Adding the Stem
Once you have your flower head shaped, adding the stem is the next step. This usually involves taking a green pipe cleaner and twisting it around the base of your flower head. This not only gives the flower a stem but also helps to secure the petals firmly in place.
You can make the stem as long or as short as you need, depending on how you plan to use your pipe cleaner flower. If you're putting it in a vase, a longer stem is good. If you're adding it to a card, a shorter one might be better. You can also twist a couple of green pipe cleaners together for a thicker, sturdier stem, which is rather useful for bigger flowers.
Step-by-Step Guides for Popular Pipe Cleaner Flowers
Now that you have a grasp of the basic ideas, let's look at how to make some specific types of pipe cleaner flowers. These instructions are simple and will help you create beautiful blooms that, honestly, look far more intricate than they truly are. It's pretty amazing what you can do with just a few twists and bends.
Remember, the goal is to have fun and be creative. Don't worry about perfection; each handmade flower will have its own special charm. And you can find other fun ideas right here on our site, too, if you want to explore more.
Creating Pipe Cleaner Daffodils
Daffodils are such cheerful flowers, and making them with pipe cleaners is quite satisfying. To make pipe cleaner daffodils, you'll primarily use yellow, orange, and green pipe cleaners. These colors really capture the essence of a spring daffodil.
Start your flower by laying three yellow pipe cleaners together. You'll want to gather them neatly, side by side.
Twist these three yellow pipe cleaners together in the middle. This creates a base for your petals and forms the center of the flower. This twist is pretty important for holding everything together.
Bend each of the six ends (three on each side of the twist) into a loop. These loops will become the petals of your daffodil. Try to make them roughly the same size for a balanced look.
Now, take an orange pipe cleaner. This will form the trumpet, the little cup in the center of a daffodil. Curl one end of the orange pipe cleaner into a tight spiral or a small cup shape.
Attach the orange trumpet to the center of your yellow petals by twisting the other end of the orange pipe cleaner around the twisted yellow base. Make sure it's secure.
Finally, take a green pipe cleaner for the stem. Twist one end of the green pipe cleaner around the base where all the other pipe cleaners meet. You can make it as long as you like. You can also add a small leaf by bending another green pipe cleaner into a simple leaf shape and twisting it onto the stem, which is a nice touch.
These pipe cleaner daffodils look very pretty and can truly brighten up any home. They are a bit like a little ray of sunshine that you can create yourself.
Making Charming Pipe Cleaner Tulips
Crafting stunning pipe cleaner tulips is surprisingly simple, and they can really brighten up any space. You just need a few basic materials, and you don't need any special skills at all. They are very colorful, too, which is nice.
Pick pipe cleaners in your favorite colors for the petals. Red and green are good choices for a classic tulip, but you could use pink, purple, or even yellow. You'll need about three to four pipe cleaners for the petals of each flower.
Take one of your chosen petal-colored pipe cleaners and fold it in half. Then, gently curve the ends inwards to form a soft, rounded petal shape. You'll want to make a few of these, perhaps three or four, for one tulip.
Gather these petal shapes together at their folded ends. You'll want them to overlap slightly to create the closed cup shape of a tulip. Hold them firmly at the base.
Take a green pipe cleaner. This will be your stem. Twist one end of the green pipe cleaner tightly around the gathered base of your tulip petals. Make sure it's snug so the petals stay in place. This step is pretty important for the flower's structure.
Adjust the petals slightly to make them look like a natural tulip bloom. You can gently squeeze them together or open them up a little. You can also add a simple leaf by twisting a small piece of green pipe cleaner onto the stem. This adds a bit more realism, you know?
These pipe cleaner tulips are a delightful way to add color without needing a green thumb. They look very charming in a small vase or even as part of a handmade gift.
Crafting Lovely Pipe Cleaner Hyacinths
Hyacinths, with their dense clusters of tiny flowers, might seem a bit more involved, but they are also quite manageable to make with pipe cleaners. These, too, would make beautiful gifts to brighten up any home, honestly. They have a very distinct look.
Choose a color for your hyacinth bloom, such as purple, blue, or pink. You'll need several pipe cleaners of this color, perhaps four to six, depending on how full you want your hyacinth to be.
Take one pipe cleaner and make a series of small, tight loops along its length. These loops will represent the tiny individual flowers that make up a hyacinth spike. You'll want to keep them fairly close together.
Repeat this process with the other colored pipe cleaners, creating more of these looped sections. The more loops you make, the fuller your hyacinth will look. It's a bit repetitive, but the result is quite nice.
Gather all these looped pipe cleaners together. You'll want to stack them on top of each other, forming a cylindrical shape. This will be the main body of your hyacinth bloom. Try to keep the loops facing outwards, if you can.
Take a green pipe cleaner for the stem. Thread one end of the green pipe cleaner through the center of your stacked loops, from the bottom. Then, twist it securely around the base of the bloom to hold everything together. This is a pretty key step.
Gently fluff out the loops on your hyacinth to make it look full and round, like a real hyacinth spike. You can also add a couple of long, thin green leaves by twisting more green pipe cleaners onto the stem near the bottom. This makes it look more complete, you know?
These pipe cleaner hyacinths have a lovely, textured look and add a touch of elegance. They really do stand out when placed in a small display.
Tips and Tricks for Your Pipe Cleaner Flowers
Once you've mastered the basic pipe cleaner flower designs, there are many ways to get even more creative. You can really personalize your creations and make them truly unique. It's all about playing around with the materials, actually.
Mix Colors: Don't just stick to one color for petals. Try twisting two different colored pipe cleaners together before shaping them into petals for a variegated look. This can make your pipe cleaner flowers look very interesting.
Add Details: For more advanced tips and custom designs, consider adding tiny beads to the center of your flowers for a stamen effect, or use a different colored pipe cleaner to create a contrasting center. A bit of glitter glue can add sparkle, too, which is pretty fun.
Vary Sizes: Make flowers of different sizes to create a more natural-looking arrangement. Some small buds and some larger, open blooms can look quite charming together. This adds a bit of depth, you know?
Creative Displays: As mentioned, these flowers look adorable in old, glass soda bottles. You can also put them in a small ceramic vase, or even a simple glass jar. They are quite versatile for decorating.
Gift Ideas: Add these flowers to a card for a special handmade touch. They also make lovely additions to gift wrapping, or you can bundle a few together with a ribbon to create a small bouquet that lasts forever. They are very thoughtful presents, honestly.
Crafting with Kids: If you're looking for a fun and easy craft for kids, these pipe cleaner flowers are just what you need. They're colorful, simple to make, and require only a few basic materials, making them a perfect activity for little hands. It's a very engaging project for them, too.
With just a few simple steps, you can create beautiful blooms that last forever. These tips help you go beyond the basics and truly make your pipe cleaner flowers special. It's all about letting your imagination lead the way, you know?
Common Questions About Pipe Cleaner Flowers (FAQs)
People often have a few questions when they start making pipe cleaner flowers. Here are some common ones, with straightforward answers to help you along.
How do you make a simple pipe cleaner flower?
To make a very simple pipe cleaner flower, you can take about three to four pipe cleaners of your chosen flower color. Twist them together in the middle to form a bunch. Then, bend each end into a loop to create petals. Finally, take a green pipe cleaner and twist it around the base of the petals to form a stem. It's quite quick, actually.
What can I make with pipe cleaners for flowers?
You can make a wide variety of flowers with pipe cleaners. Popular choices include daffodils, tulips, and hyacinths, as we've discussed. You can also make simple daisies, roses (by coiling a pipe cleaner), or even abstract flower shapes. The possibilities are pretty vast, honestly, limited only by your imagination and the way you bend the fuzzy sticks.
Are pipe cleaner flowers durable?
Yes, pipe cleaner flowers are quite durable. Since they are made from wire and fuzzy material, they hold their shape well and don't wilt or fade like real flowers. They can last for a very long time, making them a great option for everlasting decor or gifts. They are pretty resilient, you know, which is a nice feature.
These answers should help clear up some common thoughts you might have. Making pipe cleaner flowers is a very rewarding activity, and it's something you can truly enjoy doing. For more ideas on crafting, you might find some useful information over at Crafting Basics, too.
So, pick pipe cleaners in your favorite colors, and get ready to create something wonderful. You can choose red and green for a classic look, or go for a rainbow of shades. Follow these easy steps, and you'll have your own handmade pipe cleaner flower in no time. It's a really simple process, and the results are truly charming. Learn more about pipe cleaner flowers on our site, and get ready to bring some whimsical, everlasting flowers into your life right now!
/PipecleanerFlowers-Header-5ba533f1c9e77c00505d109a.jpg)
How to Make Pipe Cleaner Flowers
Easy Pipe Cleaner Flowers | Fun Family Crafts

Craft Corner: How to make Pipe Cleaner Flowers | Suburban Mum
